
Here's how I clean all of the copper jewelry that I make and sell at http://redpanda.etsy.com
You'll need a few things:
Bottle of plain white vinegar
Salt
Water
Baking Soda
Optional but totally awesome:
Jewelry tumbler with stainless steel shot and basic Dawn dish soap
Alright! To get started, take your old, tarnished, brown, yucky copper and put it in a small, shallow bowl. I use a 1/2 cup measuring bowl.
Pour enough vinegar into this bowl to cover your jewelry piece. Sprinkle 4 or 5 shakes of salt in. Now use your finger or other stirring utensil to stir your item around in the vinegar for about twenty to thirty seconds. You'll see it start to change color right before your eyes as the vinegar eats away the tarnish.
Warning! You do not want to do this process for very long. Don't let your jewelry sit in the vinegar over night or anything. Just a few seconds will do! People warn that vinegar will pit your copper. This is why we take the next step.
Neutralize that vinegar. At this point I remove the jewelry from the vinegar bath and run it under the faucet to rinse. I then pour a handful of baking soda into my hand put a little water in, and bathe that jewelry in the baking soda paste. Another warning! If you have especially fine jewelry or there are smooth expanses of metal in your jewelry, be warned that baking soda can scratch if you rub it in. A gentler method is to lay down the piece, sprinkle the soda over it, and rinse.
The things I make have lots and lots of crevices and no large smooth expanses, so I just go quick and easy baking soda in hand method.
Okay, rinse again! Dry thoroughly.
You will notice your jewelry is now exceptionally shiny. If you are a jewelry owner and not a jewelry maker, then you probably don't have a jewelry tumbler for the next part and that is okay! It just adds a super shiny sheen to it. For practical purposes, a quick vinegar bath is enough for most peoples' tastes. If you own any redpanda pieces, I offer a lifetime guarantee and I will gladly take back any copper jewelry and re-shine/tumble it for you for no charge.
If you have a rotary jewelry tumbler, put in your stainless shot and your jewelry piece, fill with water until there's about of water over your piece, and add a squirt of dish soap. Tumble for however long you normally tumble, rinse, and dry.
Voila! Beautiful, shiny, copper jewelry. Looks kind of like rose gold when it's this shiny and clean.
Here's a before and after picture for you. 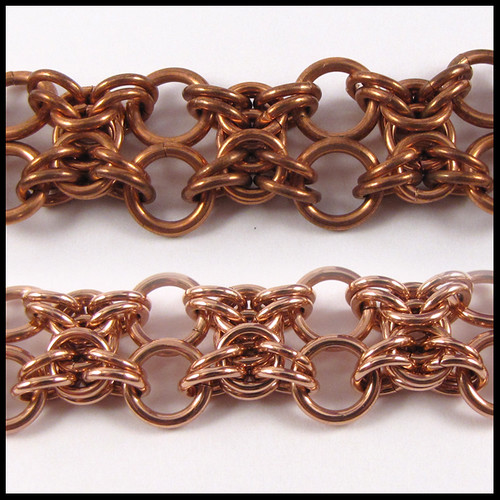
Happy shining!
Saturday, September 5, 2009
How to make copper jewelry truly shine
Wednesday, August 19, 2009
4 steps to turn your monitor into a minimalistic, auto-rotating mini art gallery
As you probably know, on a Mac you can have the computer automatically rotate through a folder of pictures, changing your desktop background for you.
Those of us on Windows computers aren't so lucky, right? Actually, you can have the same thing if you don't have a Mac. Yay! Here's how to change your computer screen from a static, cluttered mess into a minimalistic, streamlined, fluid, auto rotating art gallery!
Here's what the final result looks like: 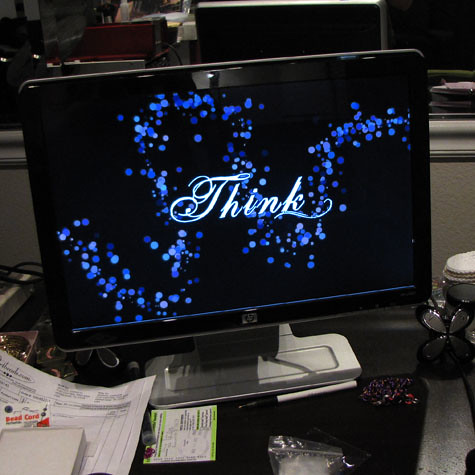
Please disregard my cluttered desk. I apologize about that. The point is, what you see on the computer is the wallpaper and nothing else. Hooray!
1. Download and install John's Background Switcher. This is a nifty program because not only will it automatically rotate your backgrounds, but you have options of where it gets the backgrounds that it will rotate. You can set it to folders on your computer with pre-downloaded backgrounds, or with family pictures. You can set it to recently popular pictures on flickr.com, or pictures from facebook, among other things.
2. Clear all the icons off your desktop. You don't need them there! Put the few programs you access all the time (internet browser, word processor, whatever you use) in the quick launch bar right by your start button. You can even get rid of the Recycle bin and the My Computer link. They are always accessible in the future via the start menu. Delete all the shortcuts off your desktop.
3. Make your start toolbar auto hide itself. To do this, right click on it, click properties, the auto-hide the task bar.
4. Set the background switcher to whatever interval you'd like to see new backgrounds, tell it from where you'd like your backgrounds, and you are good to go!
I love the way I can constantly go searching for art, and I always have a new surprise when I wake up in the morning to get myself inspired.
You can download the background in my picture here. I've also recently fallen in love with www.wallcoo.com for backgrounds. It's in Chinese, but it's easy enough to figure your way around after a while.
Hope you enjoy!
Sunday, May 3, 2009
How to make a quick, easy pliers holder
Today I was cleaning my workspace, and I decided I needed a place to hold my recently used pliers. I considered getting a wooden desktop holder, but then decided that a hanging option would be idea to conserve precious desk space. I almost went and got a few fancy hooks, but then an idea struck me! Magnets!
I went out and rounded up some supplies, and my idea worked out great. Here's a picture tutorial so you can make your own, if you're so inclined.
1. First off, gather your materials. I wanted something easy to hang on my wall, and this cake pan already had a hole in it, was magnetic, and it was the size I needed for 4 pairs of pliers. 
You'll need:
Shallow cake pan or cookie sheet if you have a lot of pliers
Strong magnets
Glue. I used jewelry glue, because it's what I had around. Make sure the glue you get can glue metal to metal.
2. Position your pliers where you'd like them to hang on your cake pan and make note of where the "join" of them are. This is where you will glue the magnets. 
3. Glue down your magnets and let them dry. 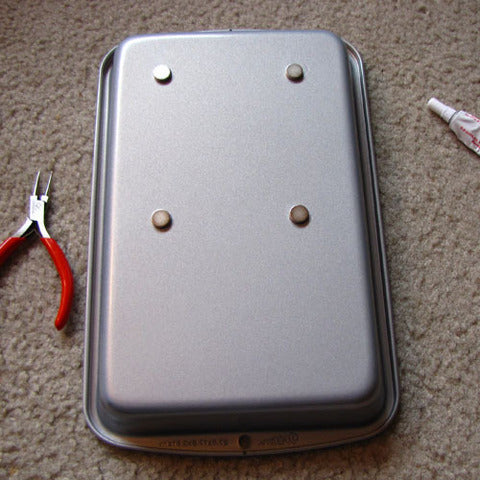
4. Hang your new magnetic pliers holder on the wall, and put your pliers on. Voila! You are done! 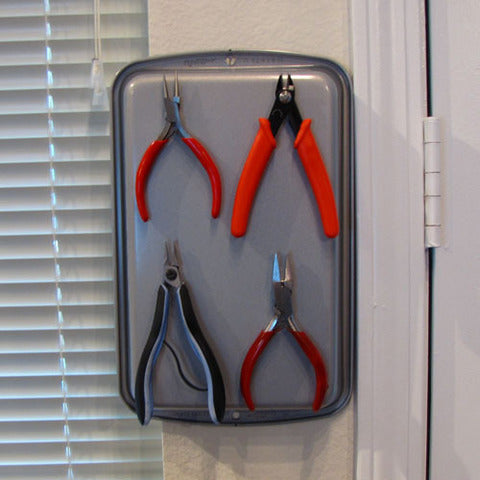
Not the prettiest hanging pliers holder out there, BUT it's super quick to make, super cheap (my total cost was about $7.00 for cake pan and magnets), and it works! It's a little big for my small space, but I'm not worried about aesthetics so much as getting my pliers off my desk. Good to go!
You might want to secure both the bottom and the top holes, so it does not come loose from the wall when you pull off a pair of pliers.
Hope you guys have fun making your own! :)
<3 Jessica
Friday, April 10, 2009
Vacation time!
I'm on a much needed etsy vacation! Here's the scoop:
I am on etsy vacation until further notice. This means that if you go to my etsy store at http://redpanda.etsy.com, you'll notice almost all of my items are gone! Not to worry though, they'll be back soon. :)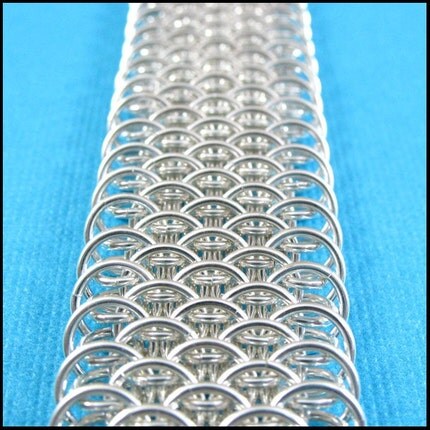
Now, I'm not on chainmaille vacation, just on etsy vacation. If you need some lovely maille (which of course you do), almost all my items from etsy are now available in my artfire shop at http://redpanda.artfire.com as well as on my website www.redpandajewelry.com.
Throughout my vacation I'll still be working on custom orders, making new items, taking product pictures, and packaging and shipping orders along with pretty much everything I do when I'm not on vacation. I just need a pause in my etsy orders so I can get caught up, and to finally take some relaxing time once I am fully caught up.
In the week I'm on vacation, I plan to have all pending custom orders made, photographed, listed, and shipped out. I'll be completely up to date with all orders. I plan to completely reorganize and clean my crafting space, to make better use of everything. I intend to work out a new shipping system, so the process is more smooth and my boyfriend can help me out when things get hectic. I also plan on reading a book in a bubble bath, going out to dinner, and watching a movie on the couch with my boyfriend. Vacations are for relaxing, too! It's been really hard for me to find time to relax lately, and I think a de-stressing is in order.
Thank you everyone for your continued support! I'm still around and online, so if at any time you have any questions, comments, or if you'd like me to start a custom order for you, send me an etsy convo, artfire message, or email to redpandajewelry@gmail.com.
See you in a week!
Jessica
Saturday, March 28, 2009
Artfire is awesome!
Hi everyone! I want to share with you a relatively new site called ArtFire. It's mostly for handmade items, like etsy, but there's also sections for design, and for supplies/vintage. They have some pretty cool features that are different from etsy, and once the site gets going (it's still in beta now) I think it is going to be Fabulous!!
Best part about it? They're offering $7.00/mo verified memberships for the first 5000 people that sign up. Seven dollars a month. That's it. That's 23 cents a day. That's the same as it costs to list or relist one item per day on etsy (about). My etsy bill is usually about $30 to $50 per month, so seven is a GREAT deal! There are no listing or transaction fees. Just the one monthly.
They have individual item in house stats as well as google analytics. They also have have a feature called My Market Hub which allows you to link to your presence on social networking sites like twitter, myspace and facebook, but also to your blog and even to your etsy site!
They have a one page listing process that's nice and simple. You can accept offers on your items (although this is not something that I do). Google Checkout and RME are integrated! You can set your items to automatically markdown themselves. It's super easy to have a sale because you can just use the feature to mark down your items however much you'd like. Then when your sale is over it'll turn right back. Lots of other great things are features as well. :D
Of the first 5000 accounts, there are fewer than 100 left! This is the final countdown. The $7.00/month is only for the first 5000, so sign up now to secure your price. Traffic is good there, and I've made enough so far in the few months I've been there to cover my fees for years. Anything I sell there is pure profit, no pesky fees! It's great. Admin there are so responsive, too. That's one of the best parts is the helpful administrators.
Here's the link if you all would like to sign up!
Click here to sign up for a verified artfire account. :)
Can't wait to see you all there. :D
<3 Jessica
http://redpanda.etsy.com
http://redpanda.artfire.com
Saturday, March 14, 2009
How to get twitter followers who love your site
So of course you've heard about twitter by now. What IS twitter? http://www.twitter.com. It's a site for what's called "micro-blogging". You've got 140 characters to say whatever you want. You can follow other peoples' updates, and reply to their updates as well.
I tend to tweet whenever I list new interesting items, but mostly about my personal life, what's going on, fun/informative links, and most importantly, I reply to other tweets! This makes for a sense of community. I like community. :)
Here's the secret to being successful on twitter! TARGET who you're following. When you follow someone, they get an email saying you're following them, and they're likely to follow you back. This will put your updates in their timelines, and they'll read what you have to say whenever they log on.
Twitter has this nifty search tool (search.twitter.com). Think of a term that is relevant to your business, to find people who are talking about it. If you make candles, search for candles and follow the people who are talking about candles. These are people already interested in the products you make. You're just introducing yourself to them.
Use the site www.tweetbeep.com to set up a notification of new people talking about you or the kind of things you make. I have tweetbeeps set up for redpanda, chainmail, and chainmaille. That way whenever someone tweets about chainmail, I know who they are and I can follow them.
Follow people how are following companies relevant to you. Do you sell on etsy or artfire? Here is the link to their twitter accounts. http://twitter.com/etsy http://twitter.com/artfire By following the people that are following your selling sites, you are introducing yourself to people who are already familiar with your site. They just might not have known about your specific site on their main page yet.
Think of your target market, and who they would be following. Then go and follow all of them!
Note it's against twitter rules to just massively follow everyone. Follow in moderation, and follow relevant people whose tweets interest you.
After a while, if you want to clear out those who aren't following you back, you can use http://www.lessfriends.com to do so. I do this very rarely, and of course I don't unfollow many people. Just ones who haven't updated in a while.
In the left part of my twitter page, I have a small collage of my items with my web address. Anyone who looks at my page will instantly know what I make and where to find it. To upload your own image, go to settings, then design, then change background image.
I'd love to see you all on twitter!
<3 Jessica
http://www.twitter.com/redpandajewelry
Tuesday, March 3, 2009
Canon Powershot SX10IS Camera

Canon Powershot SX10IS
This is the camera I'm upgrading to once I save up some money. I have a currently have a Canon powershot A630 now, which I love. My favorite part about it is the flip out LCD that rotates. It's super easy for me to take pictures from any angle, and I can always clearly see what I'm doing.
There are two main reasons I'm upgrading to the SX10 IS. One, the IS stands for Image Stabilization. My current camera doesn't have this. I don't shoot with a tripod, so I think it'll help me un-blur some of the pics I take. Two, it has a super macro setting! I use my camera I'd say 90% for taking jewelry photos, which are almost all very up close and detail oriented. I'm excited about super macro! It can take pics from 0 cm. Yes, zero. Apparently you can take pictures of things right on the lens. Haha. I'm not sure they mean that exactly, but I'm excited to test out its capabilities.
And then ten megapixels over eight is an improvement, although I shoot mostly for web viewing so I admit I don't shoot at full resolution anyway. So 10 over 8 doesn't make that big of a difference to me.
This camera is about as close as I can get to DSLR without actually having to deal with learning how to use a DSLR. I shoot in manual mode now, but I like not having to worry about lenses and I like having all kinds of cool settings if I want to use them (which sometimes I do). Plus the price break is nice.
Once I get it and take pics with it, I'll share the results! You can see the picture results from my current Canon Powershot A630 at http://www.redpandajewelry.com
<3 Jessica
Tuesday, December 9, 2008
My New Packaging!

This is my new Red Panda packaging! All orders will arrive to you in a nifty box as such. PLUS it's super green! Here's in the info on the box:
"100% Recycled Jewelry Boxes. Box board consists of 100% recycled fiber - on average 80% is post consumer. Paper wrap material is Manufactured Carbon Neutral, FSC Certified, Green-e certified with wind certificates, Process Chlorine Free (PCF), Made in the USA with 100% post consumer waste & Green seal certified. All jewelry boxes are two piece rigid setup boxes filled with non-tarnishing ultra white synthetic cotton."
I also ship in 100% recycled mailers.
I'm rather happy with the way everything looks. What do you think?
Monday, December 8, 2008
My lightbox
Today I went to Target and picked up this table so I would have a dedicated photo taking area.
This is my light box! It's literally a box. It's a ghetto light box. Haha. I took a cardboard box, cut holes in three sides of it, and then taped a white sheet over the holes.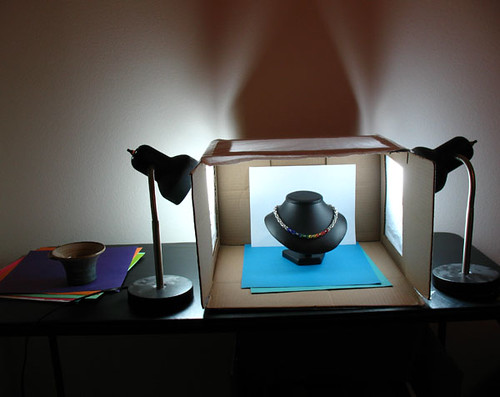
With the table at target I got some of those nifty halogen daylight bulbs, and I can already tell it's making a huge difference in my photos just from the ones I took today.
The little lamps are also from Target, super cheap (careful don't let the light bulbs rest on the sheets! fire hazard!)
I've been meaning to get a taller lamp that can lean right over the top possibly, but obviously haven't done that yet.
In the shot are my two main props: my necklace bust and my piece of pottery that I got from a secret buddy exchange that I photograph all my earrings on. I don't know what the pottery was supposed to be used for, but it is perfect for earring photography!
Also lots of scrapbooking paper, although I almost always use the purple. It just seems to look good always.

